
This homemade peach syrup is a versatile sweetener ideal for breakfast toppings and chilled desserts. It captures the concentrated flavor of ripe summer peaches in a shelf-stable or refrigerated format.

List of ingredients
- 2 large ripe peaches – pitted and sliced.
- 1 cup granulated sugar – ensures sweetness and preservation.
- 1 cup water – acts as the base for the syrup.
step-by-step instructions
- Prepare fruit: Remove the pits from the peaches and slice each fruit into pieces.
- Combine: Add the sliced peaches, sugar, and water to a large skillet and stir until combined.
- Boil: Place the skillet over high heat and bring the mixture to a rolling boil.
- Simmer: Let the mixture boil for 2-3 minutes, stirring frequently to prevent the sugar from scorching.
- Initial cool: Remove the skillet from the heat and allow the syrup to cool; it will naturally thicken during this phase.
- Strain: After cooling for approximately 30 minutes, press the mixture through a fine sieve or strainer to remove solids.
- Bottle: Transfer the strained syrup into a clean glass jar and discard the remaining pulp.
- Store: Keep the syrup in a sealed jar in the refrigerator for 3-4 weeks.
Techniques for Adjusting Syrup Thickness
Creating a Cornstarch Slurry
To achieve a thicker consistency, mix cornstarch and cold water in a two-to-one ratio. Use a small whisk or fork to stir the mixture until it is completely smooth and free of clumps. Once the peach syrup is removed from the heat, whisk in this slurry slowly to avoid lumps.
Integrating Gelatin for Structure
For a heavier, more stable syrup, dissolve a small amount of plain gelatin powder in cold water and whisk thoroughly. Slowly pour this mixture into the syrup while it is still simmering over low heat. Add the gelatin water in tiny increments, allowing the syrup to thicken before adding more to avoid a jelly-like texture.
Reducing Through Extended Simmering
If you prefer a thicker syrup without adding extra ingredients, increase the simmering time over medium-low heat. This allows more water to evaporate, concentrating the sugars and fruit pectin. Monitor the viscosity closely to ensure the syrup does not become too sticky or burn.
Using Pectin for a Gel-Like Finish
Adding a small amount of fruit pectin can create a syrup that clings better to pancakes or waffles. Mix the pectin with a portion of the sugar before adding it to the boiling mixture to prevent clumping. Boil the mixture for an additional minute to activate the pectin’s thickening properties.
Creative Serving and Usage Ideas
Breakfast Toppings
Drizzle the syrup over fresh pancakes, Belgian waffles, or French toast for a fruity alternative to maple syrup. It also works well stirred into Greek yogurt or drizzled over a bowl of steel-cut oats. The sweetness complements the neutrality of grains and dairy.
Dessert Enhancements
Use the syrup as a topping for vanilla bean ice cream or swirl it into a thick milkshake. It can also be used as a glaze for fruit tarts or poured over a slice of cheesecake. For a lighter option, use it to sweeten fresh whipped cream.
Homemade Peach Soda
Combine the non-thickened version of the syrup with chilled seltzer or club soda. Stir in a few ice cubes and a slice of fresh peach for a refreshing carbonated beverage. This provides a controlled amount of sweetness compared to store-bought sodas.
Non-Alcoholic Drink Mixers
Stir the syrup into iced tea or lemonade to create a peach-infused beverage. It can also be shaken with cold brew coffee and a splash of cream for a unique summer latte. The syrup dissolves quickly in both hot and cold liquids.
Cake and Pastry Glazing
Warm the syrup slightly and brush it over the top of a warm peach cobbler or pound cake. This adds a glossy finish and an extra layer of concentrated fruit flavor. It also prevents the surface of the cake from drying out.
Preservation and Storage Methods
Water Bath Canning Process
For long-term storage, use the traditional water bath canning method with sterilized jars and lids. Process the jars according to standard canning guidelines to make the syrup shelf-stable for up to one year. Ensure there is proper headspace at the top of each jar before sealing.
Refrigeration Guidelines
Store the syrup in an airtight glass jar in the refrigerator to maintain freshness for 3-4 weeks. Once a canned jar’s seal is broken, the syrup must be refrigerated immediately. Use the opened syrup within two weeks to ensure optimal quality.
Maintaining Jar Sterility
Before transferring the syrup, boil your glass jars and lids to remove contaminants. This prevents mold growth and extends the shelf life of the syrup in the fridge. Always use a clean spoon when scooping syrup to avoid introducing bacteria.
Freezing for Long-Term Use
If you cannot can the syrup, you can freeze it in freezer-safe containers or silicone molds. Thaw the syrup in the refrigerator overnight before using. Shake or stir the syrup after thawing to reintegrate any separated ingredients.
Professional Preparation Tips
Selecting the Best Peaches
Choose peaches that are ripe and fragrant, as they contain the highest natural sugar levels. Gently press the fruit near the stem; it should give slightly but not feel mushy. Avoid peaches with bruised skin or overly firm flesh, as they lack the necessary flavor intensity.
Managing Heat to Prevent Burning
Keep the skillet moving by stirring the mixture frequently during the boiling process. Sugar can caramelize or burn quickly at the bottom of the pan if left undisturbed. Using a wide-bottomed skillet helps distribute the heat more evenly across the mixture.
Using Sugar Substitutes
If using a granulated sugar alternative, ensure it has similar melting and caramelization properties to sucrose. Some alternatives may affect the final viscosity, making the syrup thinner than usual. Adjust the simmering time or use a thickener if the consistency is too watery.
Optimizing the Straining Process
Use a fine-mesh sieve for a standard syrup, but use a cheesecloth or nut milk bag for a crystal-clear result. Pressing firmly on the pulp with the back of a spoon extracts the maximum amount of flavor. Save the remaining peach pulp for use in smoothies or oatmeal.
Common Troubleshooting
Addressing Watery Consistency
If the syrup is too thin after cooling, return it to the skillet and simmer for another 5-10 minutes. Ensure the heat is medium-low to avoid scorching the sugar. Alternatively, use the cornstarch slurry method described in the thickening section.
Preventing Cornstarch Clumps
Never add dry cornstarch directly into the hot syrup, as this creates permanent lumps. Always create a cold-water slurry first to encapsulate the starch granules. Whisk the slurry in rapidly while the syrup is still warm for a smooth blend.
Correcting Over-Thickened Syrup
If the syrup becomes too thick or tacky, whisk in a tablespoon of water or fruit juice over low heat. Stir gently until the desired pourable consistency is restored. Avoid overheating the syrup once it has already thickened, as this may cause it to crystallize.
Handling Cloudy Syrup
Cloudiness usually occurs if the fruit was not strained thoroughly or if the syrup boiled too vigorously. To fix this, pass the cooled syrup through a coffee filter or a double layer of cheesecloth. This removes the micro-particles that cause the cloudiness.
Frequently Asked Questions
Do I need to peel the peaches before slicing?
No, peeling is unnecessary because the skins are removed during the straining process. The skins contribute flavor and color to the syrup during the boiling phase.
Can I use frozen peaches for this recipe?
Yes, frozen peaches can be used as a substitute for fresh ones. Thaw them completely and drain any excess liquid before adding them to the skillet to maintain the correct water-to-sugar ratio.
Why did my syrup crystallize in the fridge?
Crystallization happens when sugar molecules bond together, often due to rapid cooling or lack of stirring. To fix this, gently warm the syrup on the stove and stir until the crystals dissolve.
Can I use white peaches instead of yellow peaches?
White peaches can be used and will produce a syrup with a more delicate, floral flavor. The resulting syrup will be lighter in color compared to the golden hue of yellow peach syrup.
How do I know when the syrup is finished boiling?
The syrup is ready when it reaches a rolling boil and has a slightly glossy appearance. After 2-3 minutes of boiling, the fruit should be softened and the sugar fully dissolved.
Print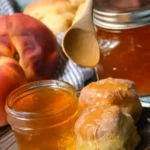
Homemade Peach Syrup Guide
- Total Time: 55 minutes
- Yield: 12 servings 1x
- Diet: Vegetarian
Description
A simple peach syrup recipe makes for a delicious topping on pancakes, waffles and even ice cream. Perfect for canning, this yummy homemade syrup lets you enjoy the flavor of summer peaches year round.
Ingredients
- 2 large ripe peaches
- 1 cup granulated sugar
- 1 cup water
Instructions
- Step: Remove the pits from the peaches, and slice each one into pieces.
- Step: Add the sliced peaches, sugar, and water to a large skillet. Stir to combine.
- Step: Bring the mixture to a boil over high heat.
- Step: Let the mixture boil, stirring often for 2-3 minutes.
- Step: Remove the skillet from heat and let the syrup cool. It will thicken as it cools.
- Step: Let the mixture cool for roughly 30 minutes, then press the mixture through a fine sieve or strainer.
- Step: Transfer the pressed syrup into a clean glass jar, and discard the pulp.
- Step: Store the syrup in a sealed jar, refrigerated, for 3-4 weeks.
Notes
No need to peel the peaches as the strainer removes the skins. For a thicker consistency, a cornstarch slurry or plant-based pectin/agar can be used. Can be processed using a water bath canning method for long-term storage.
- Prep Time: 10 minutes
- Cook Time: 15 minutes
- Category: Breakfast, Brunch, Condiment, Dessert, Sauce, Syrup
- Method: Stovetop
- Cuisine: American
Nutrition
- Serving Size: 1 serving
- Calories: 65 kcal
- Sugar: 17 g
- Sodium: 1 mg
- Fat: 1 g
- Saturated Fat: 0 g
- Unsaturated Fat: 1 g
- Trans Fat: 0 g
- Carbohydrates: 17 g
- Fiber: 1 g
- Protein: 1 g
- Cholesterol: 0 mg