
Create restaurant-style hibachi chicken in your own kitchen using a few simple ingredients. This quick stir-fry method ensures tender meat with a savory, charred finish.

List of ingredients
- 1 lb. boneless skinless chicken breasts, cut into bite-sized pieces – provides a lean and tender protein base.
- 1 tablespoon butter – adds richness and aids in the searing process.
- 1 teaspoon garlic, minced – adds a pungent and aromatic flavor profile.
- 1/4 teaspoon sesame oil (optional) – used as a finishing oil for a nutty aroma.
- 1 1/2 tablespoons soy sauce – contributes saltiness and a deep brown color.
- 1 1/2 tablespoons alcohol-free teriyaki sauce or a honey-soy mixture – provides essential sweetness and a thick glaze.
- Pepper to taste – adds a subtle spicy note to balance the sweetness.
step-by-step instructions
- Prepare the sauce: Combine the soy sauce, alcohol-free teriyaki sauce, and pepper in a small bowl and set aside for easy pouring.
- Sauté the garlic: Heat a skillet or wok over medium-high heat, melt the butter, and add the minced garlic. Cook for about 30 seconds until the garlic becomes fragrant.
- Brown the meat: Add the cubed chicken to the pan and toss to combine with the garlic butter.
- Glaze the chicken: Pour in the prepared sauce mixture and stir constantly to coat every piece of chicken evenly.
- Sear and reduce: Stir-fry for approximately 5 minutes, keeping the meat moving until the sauce has cooked down and the chicken is seared.
- Final finish: Drizzle with sesame oil if desired and serve immediately while hot.
Cooking Equipment Selection
Using a Carbon Steel Wok
A carbon steel wok is the ideal tool for hibachi chicken because it distributes heat quickly and evenly. The steep sides allow you to toss the chicken and sauce without spilling over the edges. This high-heat environment is essential for achieving the signature char and caramelization. Ensure the wok is properly seasoned to prevent the meat from sticking during the searing process.
Using a Cast Iron Skillet
Cast iron is an excellent alternative to a wok because it retains heat exceptionally well. This helps maintain a consistent temperature even after the cold chicken is added to the pan. The heavy base creates a superior sear, mimicking the flat-top grill found in steakhouse restaurants. Be sure to preheat the pan thoroughly before adding the butter.
Using a Non-Stick Pan
A non-stick skillet is a convenient option for those who want minimal cleanup and no sticking. While it does not sear as effectively as cast iron or carbon steel, it is still capable of cooking the chicken through. Use medium-high heat, but avoid the absolute highest setting to protect the pan’s coating. You may need to cook in smaller batches to prevent overcrowding.
Chicken Preparation Techniques
Achieving Uniform Bite-Sized Cubes
Consistency in the size of the chicken pieces ensures that everything cooks at the same rate. Aim for cubes approximately one inch in size to maintain a juicy interior while getting a seared exterior. Using a sharp chef’s knife and cutting across the grain will result in a more tender bite. Uniform pieces prevent some cubes from overcooking while others remain raw.
Handling Frozen Chicken Breasts
If using frozen chicken, thaw it completely in the refrigerator overnight before cooking. Thawing in the microwave can lead to uneven temperatures and may start cooking the edges of the meat. Thoroughly pat the chicken dry with paper towels after thawing to remove excess moisture. Dry meat sears much faster and develops a better crust than wet meat.
Maintaining Meat Tenderness
Avoid overcooking the chicken, as breast meat can become dry and rubbery very quickly. The high-heat, short-duration cooking method of hibachi is designed to lock in juices. Remove the chicken from the heat as soon as the internal temperature reaches 165 degrees Fahrenheit. Constant stirring prevents the meat from steaming in its own juices.
Flavor Enhancements and Sauce Tweaks
Low-Sodium Soy Sauce Substitutions
To reduce the salt content, replace regular soy sauce with a low-sodium version. Since the teriyaki sauce also contains salt, this prevents the dish from becoming overly salty. If the flavor feels too light, you can add a pinch of salt or a dash of mushroom powder. This modification makes the dish more suitable for those monitoring their sodium intake.
Adjusting the Sweetness Level
If you prefer a more savory profile, reduce the amount of teriyaki sauce and increase the soy sauce. For those who enjoy a sweeter glaze, add a teaspoon of honey or brown sugar to the sauce mixture. The sugar will help the sauce caramelize and stick to the chicken more effectively. Balance the sweetness with a small squeeze of fresh lime juice.
Adding a Spicy Kick
Incorporate heat by adding red pepper flakes or a teaspoon of sriracha to the sauce blend. You can also add diced fresh jalapeños to the pan when sautéing the garlic. For a more complex heat, use a pinch of cayenne pepper or white pepper. This adds a layer of depth that cuts through the richness of the butter.
Homemade Yum Yum Sauce Guide
Mixing the Base Ingredients
Start with a base of high-quality mayonnaise to provide a creamy and rich texture. Stir in melted butter and a small amount of ketchup or sriracha for a hint of tanginess. These ingredients form the foundation of the classic steakhouse dipping sauce. Ensure the butter is melted but not boiling to avoid breaking the emulsion of the mayo.
Achieving the Correct Consistency
The sauce should be thick enough to cling to the chicken but thin enough to dip easily. Gradually add water one tablespoon at a time until you reach your desired thickness. Stir vigorously to ensure the water is fully integrated into the creamy base. Let the sauce sit for a few minutes to allow the ingredients to stabilize.
Balancing the Tangy and Sweet Notes
Add paprika, garlic powder, and onion powder to provide a savory depth of flavor. A tablespoon of sugar is necessary to achieve the signature sweetness of yum yum sauce. For a slight acidic lift, you can add a teaspoon of alcohol-free mirin or apple cider vinegar. Taste and adjust the seasonings until the flavor is balanced between sweet and savory.
Recommended Side Dish Pairings
Preparing Hibachi-Style Fried Rice
Use day-old chilled rice to ensure the grains stay separate and do not become mushy. Sauté the rice in butter with peas, carrots, and eggs over high heat. Season the rice with a splash of soy sauce and a pinch of sugar. The cold rice fries more effectively, creating a firm texture that complements the tender chicken.
Making Buttery Hibachi Noodles
Boil yakisoba or udon noodles according to the package instructions and drain them well. Toss the noodles in a pan with melted butter and a small amount of soy sauce. Stir-fry them quickly to get a few charred spots on the noodles. This buttery side provides a rich contrast to the savory chicken glaze.
Sautéing Mixed Hibachi Vegetables
Use a mix of zucchini, onions, and carrots sliced into uniform pieces. Sauté them in the same pan used for the chicken to capture the leftover flavor. Use butter and a splash of soy sauce to season the vegetables. Cook them only until they are tender-crisp to maintain a vibrant color and snap.
Storage and Reheating Instructions
Refrigeration Guidelines
Place leftover chicken in an airtight container once it has cooled to room temperature. Store it in the refrigerator for up to three to four days. Keep the yum yum sauce in a separate airtight jar to maintain its freshness. Proper sealing prevents the chicken from absorbing other odors in the fridge.
Freezing for Long-Term Storage
The cooked chicken can be frozen for up to two months in a freezer-safe bag. Squeeze out as much air as possible to prevent freezer burn. Note that the texture of the sauce may change slightly after freezing. Thaw the chicken in the refrigerator overnight before reheating.
Best Reheating Methods
The best way to reheat hibachi chicken is in a skillet over medium heat with a teaspoon of water. This restores the moisture to the meat and prevents it from drying out. Avoid using a microwave if possible, as it can make the chicken rubbery. Heat just until the chicken is warmed through and the sauce becomes glossy again.
Common Troubleshooting Solutions
Preventing the Sauce from Burning
Because the sauce contains sugar, it can burn quickly if the heat is too high. Keep the chicken moving constantly in the pan to ensure even heat distribution. If the sauce thickens too fast, add a tablespoon of water to loosen it. Watch for the sauce to bubble and glaze rather than turn dark brown or black.
Avoiding Rubbery Chicken
Rubbery chicken is usually the result of overcooking or crowding the pan. Cook the meat in batches if you are making a large quantity to ensure the pan stays hot. High heat should be used for a short time rather than medium heat for a long time. This preserves the moisture inside the chicken breast.
Fixing a Too-Salty Glaze
If the sauce tastes too salty, add a small amount of honey or brown sugar to neutralize the sodium. A splash of water or a squeeze of lemon juice can also help dilute the intensity. You can also serve the chicken with unsalted steamed rice to balance the overall meal. Avoid adding more salt in the final seasoning stage.
Frequently Asked Questions
Can I use chicken thighs instead?
Yes, boneless skinless chicken thighs are a great alternative and are often more juicy than breasts. They can handle higher heat without drying out as quickly. Follow the same cutting and cooking instructions for the best results.
How do I get the chicken to sear without sticking?
Ensure your pan is sufficiently preheated before adding the butter and chicken. Do not move the chicken for the first minute of cooking to allow a crust to form. Using a well-seasoned cast iron or carbon steel pan also significantly reduces sticking.
What can I use instead of butter?
You can substitute butter with a neutral oil like canola or vegetable oil. However, you will lose some of the rich, nutty flavor characteristic of hibachi cooking. For a similar taste, try using Ghee, which has a higher smoke point than butter.
Is sesame oil necessary for the flavor?
Sesame oil is optional but adds a distinct aromatic quality found in Japanese cuisine. If you do not have it, you can omit it without affecting the overall structure of the recipe. You can replace it with a tiny amount of toasted sesame seeds for a similar effect.
Print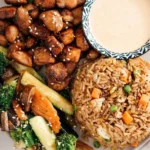
Homemade Hibachi Chicken
- Total Time: 10 minutes
- Yield: 2 servings 1x
- Diet: General
Description
Enjoy your favorite hibachi at home. Pair this hibachi chicken with some hibachi rice, noodles and veggies and the addictive yum-yum sauce.
Ingredients
- 1 lb boneless skinless chicken breasts, cut into bite-sized pieces
- 1 tablespoon butter
- 1 teaspoon garlic, minced
- 1/4 teaspoon sesame oil (optional)
- 1 1/2 tablespoons soy sauce
- 1 1/2 tablespoons alcohol-free teriyaki sauce
- Pepper to taste
Instructions
- Step: Combine the sauce ingredients and set aside.
- Step: Over medium-high heat, melt the butter and add the minced garlic. Saute until fragrant, about half a minute.
- Step: Add in chicken and toss to combine.
- Step: Pour in the sauce and stir to coat the chicken evenly.
- Step: Stir-fry for about 5 minutes until the sauce has cooked down and the chicken is seared.
- Step: Finish with a drizzle of sesame oil (optional) and dish and serve hot with hibachi rice, hibachi noodles, or hibachi vegetables.
Notes
Yum Yum Sauce: 1 cup mayonnaise, 1 tablespoon melted butter, 1/2 tablespoon Sriracha sauce/ketchup, 1/4 teaspoon paprika, 1 teaspoon garlic powder, 1 teaspoon onion powder, 1/8 teaspoon cayenne pepper, 1 tablespoon sugar, 1 tablespoon alcohol-free mirin substitute, 1–2 tablespoons water.
- Prep Time: 5 minutes
- Cook Time: 5 minutes
- Category: Main Course
- Method: Stir-fry
- Cuisine: Japanese-inspired
Nutrition
- Serving Size: 1 serving
- Calories: 450 kcal
- Sugar: 6 g
- Sodium: 750 mg
- Fat: 16 g
- Saturated Fat: 6 g
- Unsaturated Fat: 10 g
- Trans Fat: 0 g
- Carbohydrates: 10 g
- Fiber: 1 g
- Protein: 52 g
- Cholesterol: 130 mg