
This chilled dessert combines fresh, juicy summer peaches with a sweet glaze in a crisp crust. It is topped with homemade whipped cream for a refreshing finish that requires minimal cooking.

List of ingredients
- 1 – 9 inch baked single pie crust – pre-baked and cooled completely.
- 8 large fresh peaches – washed, peeled, sliced, and diced.
- 1 cup water – used as the base for the glaze.
- 1 cup sugar – provides sweetness and helps thicken the glaze.
- 3 Tablespoon Cornstarch – acts as the primary thickening agent.
- 1 3 oz package pectin-based peach gelatin – adds flavor and helps the filling set.
- 1 cup heavy whipping cream – chilled for better volume.
- 1 teaspoon vanilla – adds a classic aromatic flavor to the cream.
- 3 Tablespoons confectioners sugar – sweetens the whipped topping.
step-by-step instructions
- Prepare the glaze: Combine water, sugar, and cornstarch in a medium saucepan over medium heat. Stir constantly with a wire whisk until the mixture thickens and becomes a clear gel. Remove the pan from the heat and stir in the pectin-based peach gelatin until completely combined, then set aside to cool.
- Prepare the fruit: Wash, dry, and peel the fresh peaches. Slice them approximately 1/2 inch thick, remove the pits, and then cut those slices in half to create bite-sized chunks. Place all prepared peach pieces into a large mixing bowl.
- Assemble the pie: Pour the cooled peach glaze over the diced peaches and stir gently until every piece is evenly coated. Transfer the mixture into the prepared pie crust and use a rubber spatula to spread the fruit evenly to the edges. Place the pie on a baking sheet to catch any drips and refrigerate for at least 4 hours or overnight.
- Make the whipped topping: Pour cold heavy whipping cream into a mixer bowl. Using the wire whisk attachment, beat on high for 5-6 minutes until stiff peaks form. Mix in the vanilla extract and confectioners sugar, then beat for one additional minute.
- Final Serve: Top the chilled pie with a generous dollop of whipped cream. Garnish with a fresh peach slice and a sprig of mint before slicing and serving.
Peach Selection Guide
Choosing Tree-Ripened Peaches
Opt for peaches that have ripened on the tree rather than those picked early to be ripened in transit. Tree-ripened fruit develops a higher natural sugar concentration and a more intense aroma. This ensures the pie remains sweet without needing excessive additional sugar in the glaze.
Identifying Freestone vs Clingstone
Freestone peaches are ideal for this recipe because the pit releases easily from the flesh. Clingstone peaches have fruit that adheres closely to the pit, making dicing more difficult. While both taste great, freestone varieties save significant preparation time during the slicing phase.
Checking for Optimal Ripeness
A ripe peach should give slightly when gently pressed with the thumb near the stem end. Avoid any fruit with deep bruises, soft spots, or shriveled skin, as these indicate over-ripeness or decay. The scent should be sweet and fragrant, which is a primary indicator of peak flavor.
Fruit Preparation Techniques
Peeling Without Heat
To keep the peaches completely fresh and raw, peel them using a sharp vegetable peeler or a paring knife. While blanching in boiling water is an option, it can slightly cook the fruit and change the texture. Manual peeling preserves the crisp, fresh snap of the raw summer fruit.
Cutting for Proper Filling
Slicing peaches into 1/2-inch thick pieces and then halving them creates uniform chunks. These chunks fill the pie crust more efficiently than large slices, reducing air gaps in the final product. This method ensures a dense, professional-looking slice when the pie is served.
Preventing Fruit Oxidation
If you are not mixing the peaches with the glaze immediately, place the cut fruit in a bowl of water with a squeeze of lemon juice. The acidity prevents the peaches from turning brown through oxidation. Once the glaze is cool, drain the peaches thoroughly before coating them.
Mastering the Peach Glaze
Achieving the Correct Thickness
The cornstarch and sugar mixture must be whisked continuously over medium heat to avoid lumps. Continue cooking until the liquid transforms from a cloudy state to a clear, thick gel. This consistency is crucial for holding the peaches in place during slicing.
Integrating the Gelatin Powder
Add the pectin-based peach gelatin only after removing the saucepan from the heat. Stirring it into the hot (but not boiling) mixture ensures the powder dissolves completely without clumping. This creates a smooth, translucent finish that enhances the natural color of the fruit.
The Importance of Cooling
Never pour hot glaze directly onto fresh peaches, as it will partially cook the fruit and make it mushy. The glaze should be cool to the touch before it is combined with the diced peaches. This preserves the raw texture and ensures the gelatin sets properly in the refrigerator.
Crust Customization Options
Using Store-Bought Shells
For a quick version, use a pre-baked 9-inch graham cracker or shortbread crust. Ensure the crust is fully cooled before adding the filling to prevent the bottom from becoming soggy. A buttery crust provides a nice contrast to the tartness of the peaches.
Preparing a Homemade Single Crust
If making a crust from scratch, use a standard pastry dough and bake it until golden brown. Allow it to cool completely on a wire rack to ensure the structure is set. A homemade crust offers a flakier texture that complements the soft fruit filling.
Alternative Grain Crusts
For a different flavor profile, consider a nut-based crust using ground almonds and butter. Press the mixture into the pan and bake briefly before cooling. This adds a toasted depth that pairs well with the sweetness of the peach glaze.
Whipped Topping Secrets
Reaching Stiff Peaks
Start with heavy whipping cream that has been chilled in the refrigerator until just before use. Beat on high speed until the cream stands up on its own when the whisk is lifted. Over-beating can lead to the cream turning into butter, so monitor the texture closely.
Balancing Flavor and Sweetness
Adding confectioners sugar at the end prevents the sugar from weighing down the cream during the initial whipping process. The vanilla extract provides a floral note that bridges the gap between the cream and the peach glaze. Use high-quality vanilla for the best aromatic results.
Stabilizing the Cream for Long-Term Display
If the pie will sit out on a buffet, consider adding a small amount of cornstarch or a stabilizer to the cream. This prevents the whipped topping from deflating or weeping over several hours. This is especially useful for outdoor summer gatherings in warm weather.
Storage and Preservation
Refrigeration Guidelines
Keep the pie refrigerated at all times until it is ready to be served. The gelatin-based glaze requires a cold temperature to maintain its structural integrity. Cover the pie loosely with plastic wrap to prevent the whipped cream from absorbing refrigerator odors.
Freezing the Unfilled Crust
You can bake the crust in advance and freeze it for up to three months. Thaw the crust in the refrigerator overnight before filling it with the peach mixture. Do not freeze the pie once the fresh peaches and whipped cream have been added.
Managing Shelf Life
This pie is best consumed within three days of preparation. Because it uses fresh raw fruit, the water content will eventually break down the glaze. The whipped cream should be added immediately before serving for the best texture.
Serving and Presentation
Plating and Garnishing
To get clean slices, dip a sharp knife in hot water and wipe it dry between each cut. Place each slice on a chilled plate to keep the filling firm. Garnish with a mint leaf for a pop of color and a thin peach crescent for visual appeal.
Pairing with Other Desserts
This pie pairs well with a side of fresh berries or a scoop of vanilla bean ice cream. The creaminess of the ice cream complements the tartness of the fresh peaches. Avoid pairing it with overly heavy cakes to keep the dessert refreshing.
Adjusting Sweetness Levels
If your peaches are exceptionally sweet, reduce the granulated sugar in the glaze by two tablespoons. Conversely, if the peaches are slightly tart, you can add an extra tablespoon of confectioners sugar to the whipped cream. Always taste the fruit first to calibrate the sugar.
Troubleshooting Common Issues
Filling Not Setting Firmly
If the filling remains too soft, it may be due to using peaches with excessive water content. Ensure the peaches are patted dry after washing and before dicing. Increasing the chilling time to 24 hours can also help the gelatin set more firmly.
Glaze Becoming Too Thick
If the glaze becomes too thick to stir in the saucepan, whisk in a tablespoon of water at a time. Heat the mixture gently over low heat to loosen it before adding the gelatin. Ensure the glaze is smooth before it cools to avoid clumps in the pie.
Whipped Cream Collapsing
Cream often collapses if the bowl or whisk attachment is warm. Chill your mixing equipment in the freezer for 10 minutes before whipping the cream. This helps maintain the air bubbles and creates a more stable, fluffy peak.
Frequently Asked Questions
Can I use frozen peaches instead of fresh?
Frozen peaches can be used, but they must be completely thawed and drained of excess liquid. Note that frozen peaches often have a softer texture than fresh ones, which may result in a less firm pie slice.
Can I substitute other fruits for peaches?
Yes, this method works well with strawberries, apricots, or nectarines. If using a different fruit, ensure you use a corresponding flavor of pectin-based gelatin to maintain the color and taste profile.
How long does the pie last in the fridge?
The pie stays fresh for about 72 hours when stored in an airtight container in the refrigerator. For the best quality, store the whipped cream separately and apply it just before serving.
Print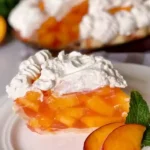
Easy No-Bake Fresh Peach Pie
- Total Time: 35 minutes
- Yield: 10 slices 1x
- Diet: General
Description
An Amazing Peaches and Cream Pie made with fresh summer sweet juicy peaches in a yummy and easy peach glaze, piled high in your favorite pie crust. Topped with light fluffy whipped cream this dessert is sure to please any peach lover.
Ingredients
- 1 9-inch baked single pie crust
- 8 large fresh peaches, washed, sliced, and diced
- 1 cup water
- 1 cup sugar
- 3 Tablespoons cornstarch
- 1 (3 oz) package plant-based peach gelatin
- 1 cup heavy whipping cream
- 1 teaspoon vanilla
- 3 Tablespoons confectioners sugar
Instructions
- Step: In a medium sauce pan, over medium heat, add water, sugar, and cornstarch. Mix until well combined. Continue to stir with a wire whisk until mixture thickens. Remove from heat. Add plant-based peach gelatin. Stir until completely combined. Set aside to cool while preparing peaches.
- Step: Wash, dry, peel and slice peaches about 1/2 inch thick. Remove pits. Cut peach slices in half. Place in a bowl. Repeat until all peaches have been prepared.
- Step: Add, cool to the touch, peach glaze. Gently stir until all the sliced peaches are coated. Pour into prepared pie crust. Spread evenly with rubber spatula. Place on baking sheet to catch any over-spill. Chill for 4 hours or overnight.
- Step: Prepare whipping cream right before serving. Add heavy cream to bowl of mixer. Using the Wire Whisk attachment, beat on high for 5-6 minutes until stiff peaks form. Add vanilla extract and powder sugar. Beat an additional minute. Serve with whipped cream and a garnish of mint and a fresh slice of peach.
Notes
Use tree-ripened peaches for the best natural sweetness. If the pie filling runs over the edge, you can pipe whipped topping around the edge to cover it.
- Prep Time: 30 minutes
- Cook Time: 5 minutes
- Category: Desserts & Sweets
- Method: No-Bake
- Cuisine: American
Nutrition
- Serving Size: 1 slice
- Calories: 264 kcal
- Sugar: 31 g
- Sodium: 66 mg
- Fat: 11 g
- Saturated Fat: 6 g
- Unsaturated Fat: 5 g
- Trans Fat: 0 g
- Carbohydrates: 41 g
- Fiber: 2 g
- Protein: 3 g
- Cholesterol: 22 mg