
This recipe produces a rich peach pie with a glossy, thick filling and a golden-brown buttery crust. By utilizing tapioca starch and a hint of paprika, the pie achieves a professional texture and a deep, balanced flavor profile.

List of ingredients
- 2 discs pie crust – prepared fresh or store-bought for the base and top.
- 2 lbs (900 g) fresh yellow peaches – approximately 6-7 peaches, peeled and cubed.
- 2 tbsp (15 ml) lemon juice or lime juice – freshly squeezed to add brightness.
- 3/4 cups (150 g) white granulated sugar – used to sweeten the peach filling.
- 1/4 cup + 1 tbsp (50 g) tapioca starch – the key to a gooey, non-runny consistency.
- 1 tsp vanilla extract – adds a warm, aromatic base note.
- 1 tsp smoked paprika or regular paprika – a secret ingredient to enhance sweetness (can substitute with 1 tsp cinnamon).
- 1 tbsp (15 g) unsalted butter – cut into small cubes for the topping.
- 1 tbsp (10 g) white granulated sugar – for sprinkling on the finished crust.
- 1 egg yolk + 1 tbsp (15 ml) milk – beaten together to create a golden egg wash.
step-by-step instructions
- Prepare the Crust: Make the pie crust using your preferred recipe or a homemade version. This can be completed one or more days in advance to save time.
- Process the Peaches: Peel the fresh peaches and cut them into 1-inch (2.5 cm) cubes. Cubing the fruit ensures a textured filling and prevents the pie from becoming mushy.
- Mix the Filling: In a large mixing bowl, combine the cubed peaches, lemon or lime juice, sugar, tapioca starch, vanilla extract, and your choice of paprika or cinnamon. Stir until all ingredients are evenly distributed.
- Preheat the Oven: Set your oven to 400F (200C) to ensure it is fully heated before baking.
- Prepare the Base: Roll out one chilled disc of dough into a 12-inch (30 cm) circle on a floured surface. Fit it into a 9-inch (22 cm) pie dish and pour in the peach filling, including all remaining liquid.
- Create the Lattice Top: Roll the second disc into a 12-inch (30 cm) circle and cut six 2-inch wide strips. Weave the strips over and under each other, trim the excess, and crimp the edges to seal the pie.
- Apply the Finishing Touches: Brush the crust with the beaten egg yolk and milk mixture, then sprinkle with sugar. Place small butter cubes into the open holes of the lattice crust to prevent filling overflow.
- Bake and Cool: Bake on the middle rack for 40-50 minutes until the filling bubbles. Once bubbling, bake for another 3-5 minutes. Cover with aluminum foil if the crust browns too quickly. Cool for 2-3 hours before serving.
Guide to Selecting the Best Peaches
Prioritizing Yellow Peaches for Sweetness
Yellow peaches are generally more suited for baking than white peaches because they possess a higher sugar content and a softer texture. This results in a filling that blends better with the sugar and starch during the heating process. Always look for fruits that feel heavy for their size.
Identifying Optimal Ripeness
Select peaches that give slightly when pressed gently near the stem. Avoid fruits that are overly soft or have bruised skin, as these will break down too much in the oven and lead to a mushy consistency. A fragrant aroma is also a strong indicator of peak ripeness.
The Benefits of Cubing Over Slicing
Cutting peaches into 1-inch cubes preserves the structural integrity of the fruit during the bake. Sliced peaches tend to release more moisture and collapse, which often results in a soupy filling. Cubes create a visually appealing texture and a more consistent bite.
Understanding the Thickening Process
The Superiority of Tapioca Starch
Tapioca starch is preferred over cornstarch for peach pies because it creates a glossy, translucent finish similar to gelatin. It is more effective at binding the juices of acidic fruits without leaving a cloudy appearance. This ensures the pie slices cleanly without leaking.
Preventing a Runny Filling
The ratio of starch to fruit is critical for achieving a gooey rather than liquid center. Ensure the tapioca starch is thoroughly mixed with the sugar before adding the fruit to avoid clumps. This allows the starch to hydrate evenly as the pie heats up.
Managing Excess Fruit Moisture
Fresh peaches vary in juiciness, which can impact the final set of the pie. If your peaches are exceptionally juicy, ensure you do not add extra liquid, but still pour all the bowl juices into the crust. The tapioca starch will encapsulate this moisture during the bubbling phase.
Advanced Crust Techniques
Maintaining Cold Dough Temperature
Keep your pie dough chilled until the moment you are ready to roll it out. If the butter in the crust melts before baking, you will lose the flaky layers. If the dough becomes too sticky, chill it for another 15 minutes before continuing.
Weaving the Perfect Lattice
When weaving the strips, gently pull the dough to maintain tension without stretching it too thin. Use a sharp knife to trim the ends and press them firmly into the bottom crust. This prevents the filling from bubbling over the sides of the dish.
Achieving a Professional Golden Glow
The egg wash consisting of yolk and milk provides the proteins and fats necessary for browning. Apply a thin, even layer using a pastry brush to avoid pooling. The sprinkle of sugar on top creates a slight crunch and a sparkling finish.
The Role of the Secret Ingredient
How Paprika Enhances Peach Flavor
While it seems unconventional, paprika adds an earthy depth that balances the intense sweetness of the peaches. It does not make the pie taste savory but instead amplifies the natural warmth of the fruit. This creates a complex flavor profile that surprises the palate.
Choosing Between Smoked and Regular Paprika
Smoked paprika adds a very subtle hint of coziness and depth, making the pie taste like it has a charred, caramelized edge. Regular paprika is more neutral and simply boosts the fruit’s vibrancy. Both options are effective for enhancing the summery notes of the dish.
Substituting with Cinnamon for Traditional Taste
If you prefer a more traditional flavor, cinnamon is the best alternative to paprika. It provides a familiar warmth and pairs perfectly with the vanilla extract. Use an equal measurement of one teaspoon to maintain the flavor balance.
Baking and Temperature Control
Using the Middle Rack for Even Heat
Baking the pie on the middle rack ensures that heat is distributed evenly between the bottom crust and the lattice top. This prevents the bottom from burning before the filling has reached the necessary temperature to thicken. Avoid placing the pie too close to the top heating element.
Identifying the Filling Bubble Point
The pie is done when the filling begins to bubble vigorously through the lattice holes. This bubbling is a sign that the tapioca starch has reached its activation temperature and has thickened the juices. Wait an additional 3-5 minutes after the first bubble for a complete set.
Regulating Crust Color with Aluminum Foil
If the edges of the crust turn dark brown before the filling bubbles, loosely cover the pie with a sheet of aluminum foil. This reflects some of the heat and slows the browning process. This technique allows the interior to finish cooking without burning the exterior.
Fruit Substitutions and Adjustments
Preparing Frozen Peaches for Baking
You can use frozen peaches if fresh ones are unavailable, but they must be completely thawed first. Blot the thawed peaches with paper towels to remove excess surface moisture. Failure to do this will introduce too much water, resulting in a runny pie.
Why Canned Peaches are Not Recommended
Canned peaches are generally too soft and have been processed in syrup, which alters their structural properties. Once baked, they often dissolve into a jam-like consistency rather than remaining as distinct cubes. For a textured pie, stick to fresh or frozen options.
Storage and Preservation
Room Temperature Storage Guidelines
A baked peach pie can be kept on the counter covered with a breathable cloth or loose foil for 2-3 days. Ensure the pie is completely cooled before covering to prevent steam from making the crust soggy. Store it in a cool, dry area away from direct sunlight.
Refrigeration for Extended Freshness
For longer storage, keep the pie covered in the refrigerator for up to 4-5 days. Cold storage helps the filling maintain its structure and prevents spoilage. However, the crust may lose some of its crispness over time in the fridge.
Freezing the Baked Pie
Fully baked pies can be frozen for up to 3 months by wrapping them tightly in plastic wrap and foil. Thaw the pie in the refrigerator overnight before serving. Note that freezing may slightly alter the texture of the crust, making it softer than fresh.
Make-Ahead Preparation
Prepping the Dough in Advance
The pie crust can be made and chilled in the refrigerator for up to 2 days or frozen for 2 months. Making the dough ahead of time allows the gluten to relax, which makes the rolling process easier. This also ensures the butter stays cold for maximum flakiness.
Baking the Pie a Day Early
You can bake the pie one day before serving to allow the filling to set completely. Let it cool to room temperature, cover it, and store it on the counter. Many find that the flavors meld and improve after 24 hours.
Reheating Your Peach Pie
The Oven Method for Maximum Crispness
Preheating the oven to 300F (150C) is the best way to refresh a pie. Cover the dish with aluminum foil to protect the crust and heat for 15-20 minutes. This restores the warmth of the filling while maintaining the flakiness of the pastry.
The Microwave Method for Speed
For a quick warm-up, use the microwave in 30-second intervals until the desired temperature is reached. Be aware that this method can make the crust chewy or soft. This is best used for individual slices rather than the whole pie.
The Stovetop Method for Bottom Crust Texture
Place a slice of pie in a skillet over medium heat with a lid for 4-5 minutes. This method is excellent for crisping the bottom crust which may have softened during storage. It provides a contrast between the warm filling and the crunchy base.
Common Troubleshooting
Why is my peach pie filling runny?
Runny filling is usually caused by using too many peaches for the amount of starch or using canned fruit. It can also happen if the pie was not baked long enough to reach the bubbling point where the starch activates. Ensure you use tapioca starch and bake until the center bubbles.
How do I prevent the edges from burning?
Burning edges occur when the oven temperature is too high or the pie is baked too long. Use aluminum foil to shield the edges once they reach a golden brown. You can also use a pie shield specifically designed for this purpose.
What should I do if the peaches are too tart?
If your fresh peaches are very tart, you can increase the granulated sugar by one or two tablespoons. Alternatively, adding a pinch of extra salt can help balance the acidity and enhance the overall sweetness. Taste a small piece of fruit before mixing the filling.
Print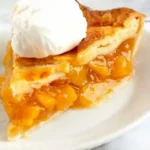
The Ultimate Gooey Peach Pie with a Flavor Twist
- Total Time: 51 minutes
- Yield: 6 servings 1x
- Diet: General
Description
The Best Peach Pie has a deliciously gooey peach filling made with fresh peaches, a buttery pie crust, a dollop of vanilla ice cream on top, and a secret ingredient that brings out all the sweet and warm summery flavor of peaches: paprika!
Ingredients
- 2 discs pie crust
- 2 lbs (900 g) fresh yellow peaches
- 2 tbsp (15 ml) lemon juice or lime juice
- 3/4 cups (150 g) white granulated sugar
- 1/4 cup + 1 tbsp (50 g) tapioca starch
- 1 tsp vanilla extract
- 1 tsp smoked paprika or regular paprika
- 1 tbsp (15 g) unsalted butter
- 1 tbsp (10 g) white granulated sugar
- 1 egg yolk + 1 tbsp (15 ml) milk
Instructions
- Step: Make the pie crust following my Homemade Pie Crust recipe or use your favorite pie crust recipe. This step can be done 1 or more days ahead of time, if desired.
- Step: Peel and cut the peaches into 1-inch cubes (2.5 cm) for a textured filling.
- Step: In a large bowl, add the cubed peaches, lemon or lime juice, sugar, tapioca starch, vanilla extract, and smoked or regular paprika (or cinnamon). Stir until combined.
- Step: Preheat the oven to 400F (200C).
- Step: On a lightly floured surface, roll out one of the chilled discs of pie dough into a 12-inch (30 cm) circle to fit a 9-inch (22 cm) pie dish and place it into the pie plate, then add in the peach filling making sure you pour in all extra liquid that’s in the bowl.
- Step: Remove the second disc of pie dough from the refrigerator and roll it out into a 12-inch (30 cm) circle. Use a knife to cut out 6 strips about 2-inches wide (about 5 cm) each. Lay the strips of pie dough over and under one another, pulling back strips as needed to weave then cut off any extra dough from the ends of the strips. Press them into the bottom layer of the crust and flute or crimp the edges.
- Step: In a small bowl, beat the egg yolk with the milk until combined and smooth then brush the pie crust with your prepared egg wash and sprinkle with sugar. Add the small butter cubes on top of the peach pie filling, right in the holes left by the top crust.
- Step: Bake in the middle rack of your oven for 40-50 minutes or until the pie filling begins to bubble. Usually, once the filling is bubbling you want to let it cook for another 3-5 minutes then remove the pie from the oven. If the crust is browning too quickly, cover the pie with a layer of aluminum foil. Allow the pie cool down to room temperature (about 2-3 hours), serve, and enjoy!
Notes
Storing: store peach pie covered at room temperature for up to 2-3 days or in the refrigerator for 4-5 days. Make-Ahead: make the crust ahead of time (chill 2 days or freeze 2 months) or bake the pie 1 day ahead. Reheating: Oven (300F for 15-20 mins), Microwave (30-second intervals), or Stovetop (medium heat for 4-5 mins).
- Prep Time: 1 minute
- Cook Time: 50 minutes
- Category: Dessert
- Method: Baking
- Cuisine: American
Nutrition
- Serving Size: 1 slice
- Calories: 440 kcal
- Sugar: 27 g
- Sodium: 210 mg
- Fat: 21 g
- Saturated Fat: 11 g
- Unsaturated Fat: 10 g
- Trans Fat: 0 g
- Carbohydrates: 46 g
- Fiber: 4 g
- Protein: 5 g
- Cholesterol: 45 mg